You checked your basement after a storm. It was damp. Or maybe your flower beds are turning to mud soup every time it rains. The culprit might not be your gutters; it might be what’s at the end of your downspout. One wrong elbow choice, and your entire drainage system fails silently.
This guide covers everything: A vs. B elbow styles, every angle from 30° to 90°, all standard sizes, materials, installation tips, and the most common mistakes homeowners make. By the end, you’ll know exactly which downspout elbows your home needs and why.
What Is a Gutter Downspout Elbow?
A gutter downspout elbow is a curved connector piece that redirects the flow of water within your downspout system. Think of it as the steering wheel of your drainage system. It determines where rainwater goes once it leaves your roof and travels down the downspout.
Elbows are typically installed in two key positions: at the top (where the gutter meets the downspout) and at the bottom (where the downspout exits toward the ground). Some installations also use a middle elbow to navigate architectural obstacles like window ledges, bay windows, or exterior trim.
The bottom line: A downspout without the right elbows is like a fire hose pointed at your own house. The right elbows cost a few dollars. Foundation repair can cost tens of thousands.
Types of Downspout Elbows: A-Style vs. B-Style Elbows
This is the question almost every homeowner stumbles on. Walk into any hardware store or browse any gutter supply site, and you’ll see “A elbow” and “B elbow.” Here’s what those letters actually mean — and how to pick the right one every time.
A-Style Downspout Elbows (Front-Facing / Straight-Out)
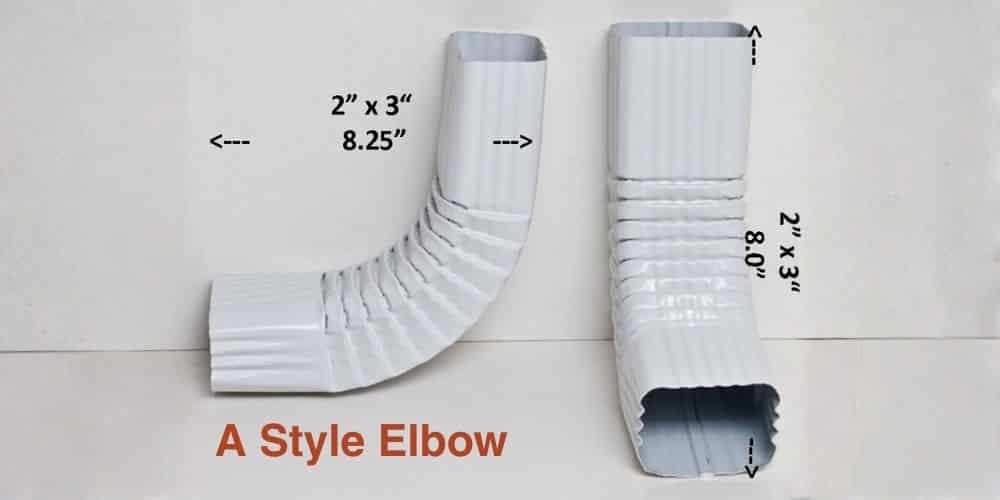
An A-style elbow is wider than it is tall when positioned for use. When you look directly at the opening, water flows straight toward you, meaning it directs water perpendicular to the face of the building, straight out and away.
In practical terms: At the top of your downspout, an A-elbow sweeps the pipe away from the gutter outlet and brings it back flat against the wall. At the bottom, it shoots water straight away from your foundation.
Best applications for A-style elbows:
- Homes with grass, mulch, or gravel directly beneath the downspout (surfaces that absorb water naturally)
- When routing water straight into a buried drainage pipe or rain barrel positioned directly behind the downspout
- When you want a clean, minimal-profile installation where the pipe hugs the wall
Not ideal when:
- You need to redirect the water left or right along the wall
- The downspout runs around a corner of the building
B-Style Downspout Elbows (Side-Facing / Left-Right)
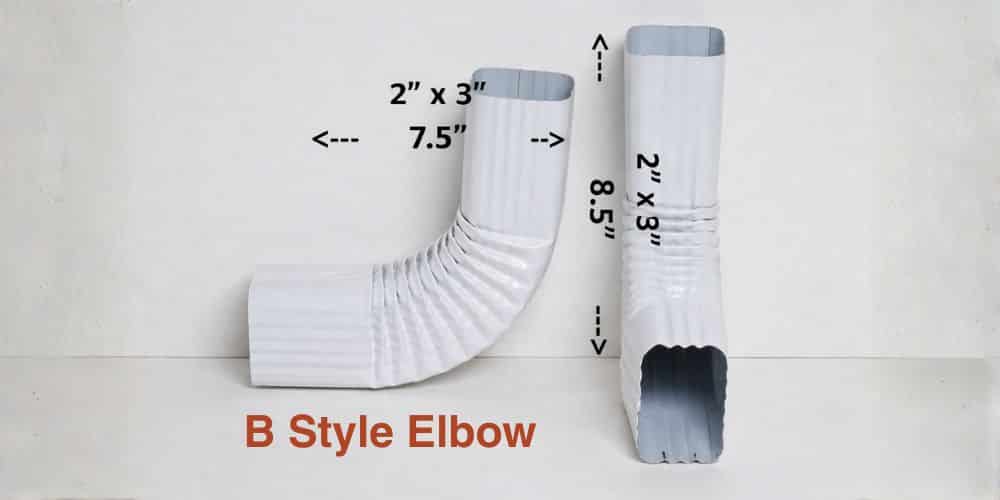
A B-style elbow is taller than it is wide. When you look at the opening, the flat face is toward you, meaning water exits to the left or right rather than straight out. This makes it the go-to choice whenever you need to steer water sideways.
In practical terms: At the top, a B-elbow runs the downspout alongside the corner of the building rather than flush against the front wall. At the bottom, it redirects water to the left or right — ideal for routing runoff away from driveways, sidewalks, or neighboring property.
Best applications for B-style elbows:
- Homes where the natural outflow point would dump water onto a driveway, sidewalk, or paved area
- Downspouts that turn a corner of the building
- Situations where a rain barrel or underground drain is positioned to the side of the downspout
- Properties with sloped yards where you need to aim water along a specific contour
Not ideal when:
- You need water to flow straight out from the building, that’s A-elbow territory
A vs. B Side-by-Side Comparison
| Feature | A-Style Elbow | B-Style Elbow |
|---|---|---|
| Orientation | Wider than tall | Taller than wide |
| Water direction | Straight out (perpendicular to wall) | Left or right (parallel to wall) |
| Top of downspout | Brings pipe back against wall | Runs pipe around corner |
| Bottom of downspout | Ejects water directly away from foundation | Redirects water to the side |
| Best ground surface | Grass, mulch, gravel | Any — especially near pavement |
| Common use | Standard wall-hugging runs | Corner runs, lateral redirections |
The simplest rule: Ask yourself, where does the water need to go? If the answer is “straight away from the house,” use an A-elbow. If it’s “to the left” or “to the right,” use a B-elbow.
Downspout Elbow Angles Explained
Beyond the A/B distinction, elbows also come in different angles. The angle determines how sharply water is redirected, and that affects flow speed, debris accumulation risk, and overall drainage efficiency.
30° Elbows (Gentle Redirect)
The shallowest bend available. A 30-degree elbow creates a very gradual change in direction, barely noticeable from a distance.
When to use it:
- Short-distance connections where a slight offset is needed between the fascia and an exterior wall surface
- Situations where the wall material creates a small gap that needs bridging
- Aesthetic installations where you want minimal visual break in the downspout line
Drainage behavior: Water maintains high velocity through a 30° bend. Very low risk of debris accumulation. Not useful if you need a meaningful directional change.
45° Elbows (Moderate Redirect)
A 45-degree elbow provides a noticeable angle change while still keeping water moving at a solid pace.
When to use it:
- Upper portions of the downspout run, where you need to angle the pipe away from the gutter outlet without a sharp break
- Systems where reducing clog formation near the gutter-to-downspout junction is a priority (the angled entry helps debris pass through more easily)
- Transitioning from a wall-mounted section to a slightly offset position
Drainage behavior: Good velocity maintenance. Slightly more debris risk than 30° but still very manageable with occasional cleaning.
75° Elbows (The Workhorse)
This is the most widely used angle for residential gutter systems, and for good reason. A 75-degree elbow provides a meaningful directional change while still allowing water to flow efficiently.
When to use it:
- Bottom of the downspout in the vast majority of residential installations
- Any standard wall-to-ground transition where you want water flowing away from the foundation
- General-purpose applications when you’re unsure which angle to choose
Drainage behavior: Strong water flow with manageable debris risk. The 75° bend provides enough sharpness to direct water decisively without creating a bottleneck. This is the “safe default” angle for most homeowners.
90° Elbows (Sharp Turns and Special Cases)
The sharpest standard elbow available, a 90-degree bend makes a full right-angle turn. It’s indispensable in specific situations but should be used intentionally.
When to use it:
- Connecting downspout outlets to underground drainage pipes (the transition from vertical to horizontal requires a 90° turn)
- Navigating tight architectural corners where there’s no room for a more gradual bend
- Depositing runoff further from the foundation using horizontal pipe extensions
- Going around protruding architectural features (bay windows, pilasters, etc.)
Drainage behavior: Sharp bends slow water and create turbulence. Debris (leaves, dirt, granules) tends to accumulate at 90° elbows more than at any other angle. If you’re using one, plan for more frequent cleaning and learn how to clear out a clogged downspout before it becomes a bigger problem.
Pro Tip: Flush-fit 90° elbows are a variation that hugs the wall more tightly than standard ones, giving a cleaner look. If aesthetics matter and you’re near an underground connection point, flush-fit is worth the slight premium.
Angle Comparison at a Glance
| Angle | Best For | Debris Risk | Water Velocity |
|---|---|---|---|
| 30° | Slight offset, short gaps | Very Low | Highest |
| 45° | Upper downspout, clog reduction | Low | High |
| 75° | Bottom of downspout, general use | Moderate | Good |
| 90° | Underground connections, tight corners | Higher | Reduced |
Downspout Elbow Sizes
Matching your elbow size to your downspout size isn’t optional, it’s essential. A mismatched elbow leaks at the joint, creates unstable connections, and can fail during a heavy storm.
Standard Residential Sizes
2″ × 3″ Elbows: The smallest and most common residential size. Suitable for single-story homes, smaller roof footprints (under 800–1,000 sq ft of roof surface area), and regions with average annual rainfall. These are the default for most suburban homes built before the 2000s.
3″ × 4″ Elbows: The upgrade option for larger homes. If your roof surface area is between 1,600 and 2,000 square feet, or if you live in a high-rainfall region, 3″×4″ provides the capacity to handle heavy downpours without overflow. If you’ve noticed your gutters spilling over during storms, this is often the fix.
4″ × 5″ Elbows: Commercial and heavy-duty residential applications. Not common for standard homes, but necessary for large commercial buildings, warehouses, or properties with dramatically large roof areas. Also used in custom architectural installations.
Sizing Decision Guide
| Roof Area | Average Rainfall Region | High Rainfall Region |
|---|---|---|
| Under 1,000 sq ft | 2″×3″ | 3″×4″ |
| 1,000–1,600 sq ft | 2″×3″ or 3″×4″ | 3″×4″ |
| 1,600–2,000 sq ft | 3″×4″ | 3″×4″ or 4″×5″ |
| 2,000+ sq ft | 3″×4″ | 4″×5″ |
Important: Always measure your existing downspout before ordering elbows. Measurements refer to the exterior dimensions of the rectangular downspout opening, not interior dimensions.
Elbow Shapes
While most homeowners interact with rectangular elbows exclusively, there are three standard shapes in the gutter industry:
Rectangular: By far the most common for residential applications. The rectangular profile provides good structural rigidity and efficient water flow. Most standard homes use rectangular gutters and downspouts, making rectangular elbows the default.
Round: Used with round downspouts, which are more common in European architectural styles and some higher-end American homes. Round elbows are also popular with ornamental copper gutter systems. They tend to handle water flow very efficiently due to the absence of corners.
Square: Less common but used in modern architectural designs that favor geometric aesthetics. Square downspouts and elbows are gaining popularity in contemporary residential builds.
Your elbow shape must match your downspout shape. Mixing shapes requires adapters and is generally not recommended for structural integrity.
Downspout Elbow Materials
The material of your downspout elbow affects longevity, maintenance requirements, cost, and visual appeal. The golden rule: match your elbow material to your existing gutter and downspout material.
| Material | Key Benefits | Drawbacks | Best For |
|---|---|---|---|
| Aluminum | Lightweight, rust-resistant, affordable, available in many colors | Can dent easily | Most residential homes |
| Vinyl (PVC) | Budget-friendly, easy to install, no rust | Can crack in cold weather, less durable | DIY projects, mild climates |
| Copper | Extremely durable, premium look, develops natural patina | Expensive, needs professional installation | Luxury or historic homes |
| Steel | Strong and durable | Heavy, can rust over time | Commercial or high-impact areas |
If you’re considering alternatives to traditional downspouts altogether, it’s worth understanding whether chain downspouts function as well as gutter downspouts before making a decision.
How Many Elbows Does a Downspout Need?
In most homes, a downspout works best with 2 to 3 elbows. That’s enough to guide water properly without slowing it down.
The basic setup is simple:
- Top elbow
This connects the gutter to the downspout. Use an A-style if the pipe runs straight down. Use a B-style if it needs to turn around a corner. - Bottom elbow
This controls where the water exits. In most cases, a 75° elbow is used to push water away from the foundation.
When do you need a third elbow?
You’ll need one if something blocks a straight run, like:
- A large roof overhang
- Windows, ledges, or exterior design features
- A corner in the wall
- Or when connecting to an underground drain
One important thing to remember:
More elbows don’t mean better performance.
- They slow down the water flow
- Increase the chances of clogs
- And add more leak points
Keep it simple. Use only as many elbows as needed to guide water safely away from your home.
Common Downspout Elbow Mistakes (and How to Avoid Them)
Even small mistakes can lead to poor drainage or leaks. Here are the most common ones to watch out for:
- Using the wrong elbow style
Choosing A instead of B (or vice versa) can send water in the wrong direction — sometimes toward your foundation. Always plan where the water should go. - Mismatched sizes
Using the wrong size elbow creates loose, leaky connections. Always measure your downspout before buying. - Skipping sealant at joints
The gutter outlet joint is a common leak point. A bit of sealant here prevents hidden water damage. - Using too many elbows
Extra bends slow water flow and increase clog risk. Stick to 2–3 elbows whenever possible. - Not securing connections
Elbows should be fixed with screws or rivets. Loose fittings can come apart over time. - Ignoring ground slope
Even a perfect setup fails if water flows back toward the house. Learn when to add extensions to your gutters’ downspouts to make sure discharge moves safely away from the foundation.
Final Takeaway
Gutter downspout elbows are small. Their impact is enormous. The right combination of style (A vs. B), angle (30° through 90°), size, and material can mean the difference between a dry basement and a flooded one, between stable landscaping and eroded soil, between a foundation that lasts generations and one that develops cracks before your mortgage is paid off.
If you’re unsure what your home needs or want a system that’s installed right the first time, American Hill Country Gutters can help you choose and install the ideal setup for long-term performance and protection.